Whole-house Repiping in Bradenton Key Takeaways
Whole-house repiping replaces aging, damaged, or unreliable water supply pipes with new plumbing lines designed to provide dependable water distribution throughout your home.
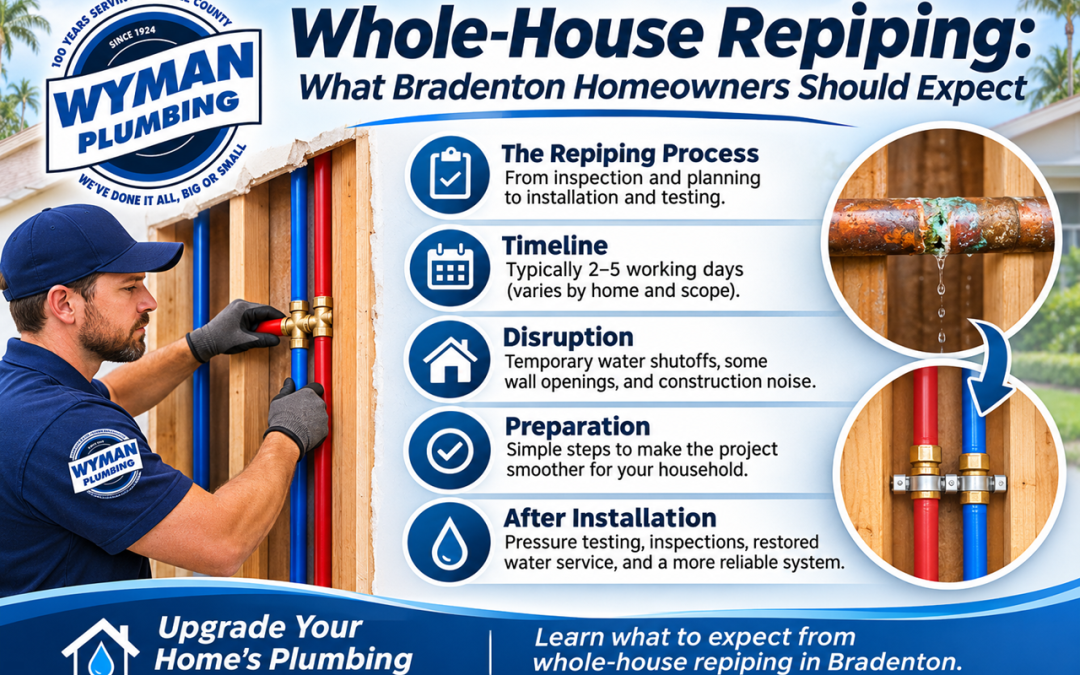
Most residential repiping projects take approximately 2–5 working days for the main installation, although larger homes, complicated plumbing layouts, inspections, and wall repairs can extend the overall timeline.
Preparing your home and understanding the installation process can minimize disruption. After repiping, your plumbing system should be pressure-tested, inspected as required, and restored to normal operation before the project is considered complete.
What Is Whole-House Repiping?
Whole-house repiping is the process of replacing the existing water supply pipes throughout a home with new plumbing materials. Instead of repairing individual leaks as they occur, repiping addresses widespread deterioration or recurring problems within the water distribution system.
For homeowners in Bradenton, Florida, whole-house repiping may become necessary when aging pipes develop repeated leaks, corrosion affects water quality, or water pressure becomes inconsistent.
A professional plumber evaluates the condition of the existing plumbing, determines which pipes need replacement, and develops an installation plan that minimizes damage to walls, ceilings, and other finished surfaces.
Unlike a standard plumbing repair, repiping is a comprehensive improvement intended to address problems throughout the home’s water supply system.
Signs Your Bradenton Home May Need Repiping
Not every plumbing problem requires replacing all the pipes. However, several warning signs may indicate that your home’s plumbing system is approaching the end of its useful service life.
Common indicators include:
- Frequent leaks in different areas of the home
Recurring pinhole leaks in copper pipes
Rust-colored or discolored water caused by deteriorating plumbing
Low or inconsistent water pressure
Visible corrosion on exposed pipes
Multiple previous plumbing repairs
Aging galvanized steel or other deteriorating supply piping
- Water damage associated with recurring pipe failures
- High water bills
Florida’s water chemistry, environmental conditions, and the age of a home’s plumbing system can influence pipe deterioration.
If you have experienced repeated copper pipe leaks, read our related article on what causes pinhole leaks in copper pipes in Florida.
A licensed plumber can determine whether targeted repairs or complete repiping would be the more practical long-term solution.
Step-by-Step: What Happens During Whole-House Repiping in Bradenton?
Understanding the repiping process can help homeowners prepare for the work and know what to expect at each stage.
Step 1: Initial Plumbing Inspection and Repiping Estimate
Before installation begins, a professional plumber evaluates your existing plumbing system.
The inspection typically includes:
Identifying existing pipe materials and their condition
Locating water supply lines and plumbing fixtures
Evaluating water pressure and recurring leak problems
Reviewing access through walls, ceilings, and attic spaces
Determining the appropriate replacement piping materials
Developing a proposed installation schedule
The plumber should also explain which portions of the plumbing system will be replaced and identify any anticipated drywall openings or other access requirements.
Homeowner tip: Request a written estimate that identifies the scope of work, pipe materials, permit responsibilities, testing, wall repairs, and any potential additional costs.
Step 2: Choosing New Plumbing Pipes
Two commonly used materials for residential repiping are PEX and copper.
PEX Plumbing Pipes
PEX (cross-linked polyethylene) is flexible plastic piping frequently used in residential water supply systems.
Advantages may include:
Flexible installation around obstacles
Fewer fittings in certain plumbing configurations
Resistance to corrosion
Reduced installation labor in some homes
Compatibility with approved residential water supply applications
PEX must be installed according to applicable plumbing codes and manufacturer requirements, including limitations involving ultraviolet exposure and heat.
Copper Plumbing Pipes
Copper is a traditional plumbing material with a long history of residential use.
Advantages include:
Durable, rigid construction
Proven performance when properly installed
Resistance to ultraviolet damage
Suitability for many hot and cold water applications
However, copper can be susceptible to corrosion or pinhole leaks under certain water chemistry and installation conditions.
The best material depends on your home’s layout, water conditions, budget, and applicable building requirements.
Step 3: Planning Pipe Routes and Access Points
One of the biggest concerns homeowners have about whole-house repiping is how much of their home will need to be opened up.
Professional plumbers generally plan pipe routes to minimize unnecessary disruption.
Depending on the home’s construction, new water supply lines may be routed through:
Attic spaces
Interior walls
Ceiling cavities
Accessible utility areas
Other approved pathways
Small openings may be necessary to access fixtures, connect new pipes, or install water lines.
In some homes, especially those with slab foundations, routing new supply lines through accessible walls and attic spaces may reduce the need to disturb concrete flooring.
The actual approach depends on the building’s design and the plumber’s assessment.
Step 4: Installing the New Water Supply Lines
Once the installation plan is established, the plumbing crew begins replacing the water supply piping.
This usually involves shutting off the water supply, installing new pipes, connecting fixtures, and securing the plumbing according to applicable code requirements.
Plumbers may work in several areas of the home, including:
Kitchens
Bathrooms
Laundry rooms
Utility rooms
Water heater connections
Other locations supplied by the home’s water distribution system
Existing pipes may be disconnected and removed where practical. Some abandoned piping may remain concealed in walls or other inaccessible areas when permitted and properly isolated.
The installation team should communicate when water service will be unavailable and when it can be restored.
Step 5: Pressure Testing and Plumbing Inspections
After the new water lines are installed, the system must be tested to verify that connections are secure and the piping can operate at the required pressure.
Testing may include:
Checking for leaks at fittings and connections
Performing required pressure tests
Verifying water flow to plumbing fixtures
Inspecting installed pipe supports and connections
Confirming proper hot and cold water connections
Completing required plumbing inspections
Permit and inspection requirements depend on the property’s jurisdiction and the scope of work.
Homeowners should confirm that the contractor has addressed applicable requirements before concealed plumbing is covered.
Step 6: Restoring Water Service and Closing Access Openings
After testing and required approvals, the plumber can complete the final connections and restore normal water service.
Access openings may then be repaired according to the project agreement.
It is important to understand that drywall repair, painting, texture matching, and other cosmetic restoration may not be included in every repiping estimate.
Clarify these responsibilities before signing the contract.
How Disruptive Is Whole-House Repiping?
Repiping is a substantial plumbing project, but it does not necessarily mean homeowners must move out temporarily.
Many families can remain in their homes during the installation, depending on the size of the project, available plumbing facilities, and their tolerance for construction activity.
Will the Water Be Turned Off During Repiping?
Yes. Water service will need to be interrupted during certain portions of the installation.
However, the water may not need to remain off for the entire project.
Depending on the installation plan, plumbers may be able to restore service at the end of each workday or maintain limited access to certain fixtures.
Homeowners should ask for an anticipated water shutoff schedule before work begins.
Will Plumbers Have to Cut Into Walls?
In most whole-house repiping projects, some wall or ceiling openings are necessary.
The number and location of these openings depend on the home’s construction and the accessibility of existing plumbing lines.
Professional installation planning can help minimize unnecessary damage, but homeowners should expect some level of drywall disruption.
Can You Stay in Your Home During Repiping?
Often, yes.
However, temporary inconveniences may include:
Construction noise during working hours
Limited access to bathrooms or kitchens
Temporary water shutoffs
Dust from drywall openings
Workers moving between rooms
Restricted access to certain areas
If your home has only one bathroom, special accessibility needs, or an unusually complicated plumbing layout, discuss accommodations with your plumber in advance.
How Long Does Whole-House Repiping Take in Bradenton?
For many typical single-family homes, the main repiping installation may take approximately 2–5 working days.
This is a planning estimate rather than a guaranteed completion time.
Several factors can affect the schedule.
| Factor | How It Affects the Timeline |
|---|---|
| Home size | Larger homes generally require more piping and connections. |
| Number of bathrooms | Additional fixtures increase installation work. |
| Pipe accessibility | Difficult-to-reach areas may require more time. |
| Home construction | Slab foundations, multiple stories, and limited attic access can complicate routing. |
| Permit and inspection scheduling | Required approvals may affect when work can proceed. |
| Drywall and painting | Cosmetic restoration may add several days or require a separate contractor. |
A straightforward repiping project may move quickly, while a complicated installation can take longer.
When comparing estimates, ask whether the quoted timeline includes plumbing installation only or the entire project through final wall restoration.
How Bradenton Homeowners Should Prepare for Whole-House Repiping
A little preparation can make the installation process more efficient and reduce unnecessary disruption.
1. Clear Access to Plumbing Fixtures
Remove personal items from cabinets beneath sinks and around plumbing connections.
Clear pathways to bathrooms, kitchens, laundry areas, and the water heater.
2. Protect Furniture and Personal Belongings
Move valuable or fragile items away from areas where plumbers may need to access walls and ceilings.
Cover furniture and electronics near anticipated work areas to protect them from dust.
3. Plan for Temporary Water Interruptions
Fill drinking water containers and make arrangements for cooking, cleaning, and bathroom use during scheduled shutoffs.
Ask your plumber whether water will be available overnight.
4. Make Arrangements for Pets and Children
Repiping involves tools, equipment, open wall sections, and frequent movement throughout the home.
Keep children and pets away from active work areas.
5. Discuss Wall Repairs Before Installation
Ask which contractor is responsible for patching drywall, matching textures, and repainting affected areas.
Having these details documented beforehand helps prevent misunderstandings.
6. Confirm Permits and Inspection Requirements
Ask who will obtain the required permits, coordinate inspections, and provide documentation when the project is finished.
7. Document Existing Conditions
Photograph areas where walls or ceilings may be opened.
This provides a useful reference for restoration and helps distinguish preexisting damage from work performed during installation.
What Happens After Whole-House Repiping Is Completed?
Once the new pipes are installed, the project moves into testing, restoration, and final verification.
Water Pressure and Fixture Testing
The plumbing contractor should verify that water flows properly through the new supply lines.
This includes checking faucets, showers, toilets, and other connected fixtures.
Homeowners may notice improved water flow if the previous piping was restricted by corrosion or buildup. However, repiping will not automatically correct pressure problems caused by the municipal supply, pressure-regulating equipment, or other unrelated issues.
Flushing the New Plumbing Lines
New water supply lines should be flushed according to applicable installation requirements.
This helps remove installation debris and air from the system.
Temporary sputtering at faucets may occur as trapped air is released, but persistent pressure problems or unusual water conditions should be reported to the plumber.
Final Inspection and Documentation
Before the project is closed out, homeowners should request relevant documentation, including:
Final invoices and payment records
Applicable permit and inspection records
Information about installed pipe materials
Contractor workmanship warranty details
Available manufacturer warranty information
Instructions for any necessary follow-up
Keep these records with your home maintenance documents.
Drywall Repair and Cosmetic Restoration
Once required inspections are complete and concealed piping can be covered, affected walls and ceilings can be repaired.
Depending on the contract, this work may be completed by the plumbing company or a separate drywall and painting contractor.
Monitoring Your Plumbing After Installation
During the first several days after repiping, check accessible connections and fixtures for unusual moisture or leaks.
Pay attention to changes in water pressure, fixture operation, or unexpected sounds.
Contact your plumbing contractor promptly if anything appears abnormal.
Is Whole-House Repiping Worth It for an Older Bradenton Home?
For homeowners experiencing repeated leaks or widespread pipe deterioration, whole-house repiping can be a practical long-term investment.
Potential benefits include:
Reducing the risk of future failures associated with deteriorated supply pipes
Avoiding repeated repairs to multiple sections of aging plumbing
Improving water flow when old pipes are restricted
Replacing corrosion-damaged plumbing materials
Providing greater confidence in the home’s water supply system
Repiping does not eliminate every possible plumbing problem. Fixtures, drains, water heaters, valves, and other components can still require maintenance or replacement.
However, replacing a deteriorating water distribution system can address the underlying cause of recurring supply-line failures.
For homeowners who are frequently scheduling plumbing repairs, a professional repiping evaluation can help determine whether replacing the entire system makes more financial sense than continuing individual repairs.
Whole-House Repiping vs. Individual Pipe Repairs
Not every leak justifies replacing an entire plumbing system.
A localized repair may be appropriate when the plumbing is otherwise in good condition and the problem is isolated.
Whole-house repiping becomes more relevant when failures occur repeatedly in different locations or when inspection findings indicate widespread pipe deterioration.
| Individual Pipe Repair | Whole-House Repiping |
|---|---|
| Addresses a specific damaged section | Replaces the home’s existing water supply piping within the agreed scope |
| Usually involves less immediate disruption | Requires more extensive access and installation |
| Generally has a lower upfront cost | Generally requires a larger upfront investment |
| Leaves most existing pipes in place | Addresses deterioration throughout the replaced system |
| Appropriate for isolated problems | May be appropriate for widespread or recurring failures |
An experienced plumber can explain the condition of your pipes and help you compare the likely costs and benefits of both approaches.
Frequently Asked Questions About Whole-House Repiping in Bradenton
1. How long does it take to repipe an entire house in Bradenton?
Most typical single-family home repiping installations take approximately two to five working days, although the timeline varies with home size, plumbing accessibility, and project complexity. Permit inspections, drywall repairs, and painting may extend the overall schedule. Your plumber should provide a project-specific timeline after evaluating your home.
2. Do I have to move out during whole-house repiping?
Most homeowners can remain in their houses during repiping, but temporary water interruptions, construction noise, and limited access to certain rooms should be expected. Some projects may require alternative arrangements, particularly when the home has only one bathroom or extensive work is necessary. Discuss daily water availability before installation begins.
3. Will whole-house repiping damage my walls or floors?
Repiping often requires small openings in walls or ceilings to access plumbing connections and route new supply lines. Floor disruption may be avoidable depending on the home’s construction and the installation plan. Ask your plumber where openings will be necessary and whether drywall repairs, painting, and cosmetic restoration are included.
4. Is PEX or copper better for whole-house repiping in Florida?
Both PEX and copper can be suitable for residential repiping when properly selected and installed. PEX offers flexibility and corrosion resistance, while copper provides rigid construction and a long history of use. The best choice depends on water chemistry, installation conditions, local code requirements, project design, and your budget.
5. What should I check after my home has been repiped?
After repiping, check that faucets, showers, toilets, and other connected fixtures receive adequate water flow and operate correctly. Look for moisture around accessible connections and report unusual pressure changes or leaks. Obtain warranty information, applicable inspection documentation, and confirmation of any remaining drywall or painting work before closing out the project.
Schedule a Whole-House Repiping Consultation in Bradenton, FL
Repeated pipe leaks, aging plumbing, and inconsistent water pressure can create frustration and increase the risk of water damage.
If you are considering whole-house repiping in Bradenton, Wyman Plumbing can help you evaluate your home’s plumbing and discuss the available repair and replacement options.
A professional plumbing assessment can help determine whether isolated repairs are sufficient or whether replacing aging water supply lines would provide a better long-term solution.
Contact Wyman Plumbing today to discuss whole-house repiping in Bradenton, FL, and take the next step toward a more reliable plumbing system.
Visit www.wymanplumbing.com to request professional plumbing assistance.